 |
| Click coaster to purchase your very own for three bucks. |

Vintage Van Lovers - Van Fans, and other Van people, Welcome to this van blog, where you'll find van pictures, van articles and more van related goodness. Dodge A100s, first-generation Chevy vans and of course, Econolines. Subscribe and receive a constant feed of delicious vintage van goodness. Yum.
Thursday, December 31, 2015
A RARE FIND FOR VAN FANS
Wednesday, December 23, 2015
WHEN IN ROME -- A VISIT WITH COBY GEWERTZ, VAN GO'S OWNER.
While in Southern California, Debbie and I had occasion to stop by for a quick visit with Coby Gewertz, owner of Van Go.
Little did we know what a treat we were in for.
Coby's pad/art studio is like a visiting the world's coolest lowbrow gallery. Everywhere I turned there was eye candy from the coolest hot rod artists of this, and past generations. We're talking original works from Roth, Jeffries, Ed Newton, Winfield, Barris.
Out of courtesy, I resisted the temptation to snap pics like a manic tourist. In retrospect, I wish I'd at least taken one snap. But I didn't. So I'll just say this. I always knew Coby was a killer graphic designer, but I never realized until yesterday morning was what a prolific collector of hot rod art the dude is.
Now for the good news. While I might not have had the good sense to take pics, my reason for the visit was to pick up a bunch of cool van art for the Vinvanco site designed by Coby for his Church, Cars Not Culture brand.

You've probably seen Church's "Van Go" artwork, where the type is stacked within a 3/4 illustration of his his van.
Well we now carry that artwork in stickers, as well as one other design. But here's the bigger news. We now have the final 18 fine art prints that Coby made of his Van Go, when he introduced it six years ago. A limited run of 63, in honor of his van's year, we've got the last 16 prints and they'll soon be in the Vinvanco store. We intend to load them onto our site shortly after returning home.
So if you've always loved Van Go, here's your chance to park an art print in your man cave. Or, if you're anything like Coby, anywhere you feel like putting it. And if you just want to grab a couple Van Go stickers, you know where to go.
Stay tuned for more Van merch from Church, including a exclusive Vinvanco "Van Go" T-shirt which is currently in the planning stages.
Happy holidays, vanners.
Little did we know what a treat we were in for.
Coby's pad/art studio is like a visiting the world's coolest lowbrow gallery. Everywhere I turned there was eye candy from the coolest hot rod artists of this, and past generations. We're talking original works from Roth, Jeffries, Ed Newton, Winfield, Barris.
Out of courtesy, I resisted the temptation to snap pics like a manic tourist. In retrospect, I wish I'd at least taken one snap. But I didn't. So I'll just say this. I always knew Coby was a killer graphic designer, but I never realized until yesterday morning was what a prolific collector of hot rod art the dude is.
Now for the good news. While I might not have had the good sense to take pics, my reason for the visit was to pick up a bunch of cool van art for the Vinvanco site designed by Coby for his Church, Cars Not Culture brand.

Well we now carry that artwork in stickers, as well as one other design. But here's the bigger news. We now have the final 18 fine art prints that Coby made of his Van Go, when he introduced it six years ago. A limited run of 63, in honor of his van's year, we've got the last 16 prints and they'll soon be in the Vinvanco store. We intend to load them onto our site shortly after returning home.
So if you've always loved Van Go, here's your chance to park an art print in your man cave. Or, if you're anything like Coby, anywhere you feel like putting it. And if you just want to grab a couple Van Go stickers, you know where to go.
Stay tuned for more Van merch from Church, including a exclusive Vinvanco "Van Go" T-shirt which is currently in the planning stages.
Happy holidays, vanners.
Sunday, December 6, 2015
TWELVE QUESTIONS WITH STEVE LUCKETT
EDITOR'S NOTE: With the
launch of our website last week, we're going to get busier with our web blog by
reaching out to fellow vanners who are either in the throes of building the
next generation of early custom vans or have just finished creating a vintage
van worth talking about. To that end, it's time to dust of the Vinvanco's
"Twelve Questions" format, which we began with the Shiner Beer van,
and continued with Coby Gewertz and his incredible Van Go. We
recently reached out to Steve Luckett who has been sharing pics of the
early Econoline panel van he's been building with his own two hands. Still in
its build phase, Steve was good enough to let us in on some of the things he's
learned as his van approaches ever closer to the road. We can't wait.

|
1. WHAT'S THE BACKGROUND STORY OF YOUR VAN. HOW DID YOU FIND IT AND
ARRIVE AT YOUR BUILD PLAN?
Well, I had always been into vans since before I was driving and my
first vehicle was a '79 Chevy van. I did its body work and paint. I always
wanted a vintage flat- faced van but never thought I would find one. Years
later and along came the internet. I found out they really are out there, and
that sometimes you have to drive pretty far to get them.

Back in 2006, I
saw the yellow bagged Econoline that had popped up online, and it was downhill
for me after that. I knew I had to build my own Econoline. One that
would lay rocker and sit on the ground just like the yellow one did. I scoured the Internet for pictures of that van and saved
every one of it that I could find. I discovered there were two bagged
Econolines that were able to lay frame. I actually scored my van relatively near me, from a guy on the H.A.M.B.
for $650 and it was a driver. I drove it for a couple of years before I dove
in.

2. DID YOU TALK TO OTHERS WHO HAD DONE IT BEFORE YOU STARTED. IF SO, WHAT DID
YOU LEARN?
Not at first. I studied those two vans and noticed that they were both
unfinished trailer queens built by mini truckers and never finished. I studied
them both and to figure out what i would do differently when i did mine. I was
full-on committed to doing my van and was pretty far into doing all the body
work, custom sheet metal work and had my floor cut out with just the cross
members showing.

Then I discovered Coby Gewertz on the H.A.M.B. and his Van Go project,
which was way further along than mine. I started pestering him and he was
helpful from the very beginning, telling me about all the issues that were
going to come about. There had been other vintage vans that had Air-Ride
suspension, either just in the rear, or front and rear, but Coby’s Van Go was
the first bagged Econoline to lay rocker and most importantly to drive. A lot
of people truly don't get that and unfortunately end up bailing out of their project when the going got too tough.
3. WHAT HAS BEEN OR IS THE HARDEST PART OF THE BUILD?
Pretty much Everything. Haha. There isn't a forum you can turn to with tons of
knowledge or direction to send you down the right path of building something
like this. There aren’t a ton of people who've already done it that you can
consult with. It's just not out there. Everything had to be figured out on my
own because I did the entire van myself. The hardest fabrication aspect of the
van was the front end and the path I chose.
I opted to keep my stock motor and tranny with the 3 on the tree and that opened up another can of worms with the shift linkage and getting it around the new front crossmember. I chose to convert to cable and it worked out good.
 |
| (Steve: If it was easy, everybody would be doing it.) |

4. WHO HAS BEEN THE MOST HELPFUL TO YOU ALONG THE WAY? ANY MENTORS?


5. WHAT PARTS DID YOU USE TO ACHIEVE THE FRONT END DROP? My front end is a universal bagged Mustang II kit that was grafted
into my frame, which has a 5" body drop. The biggest obstacle was that the widest mustang clip offered was nowhere near the width
between my frame rails and I basically needed to be sub-railed in. You can get a
lot of drop with just a clip but you have to revise the frame to get the body
drop to sit all the way on the ground. The steering rack needed to be flipped, since the van’s steering column is in
front of the front axle instead of behind the axle like in the Mustang. By
doing this, you end up reversing the way the steering works. So you have to
reverse it again to make the steering normal. The Isuzu gearbox comes directly
off the stock column to make the steering normal again. The biggest nightmare
for me on this entire project was overcoming this and making it even worse was
the fact that the master cylinder/brake booster, shift linkage, and the gear
box are all in the same spot. Trying to make everything clear the others things
and work properly was a challenge.
6. WHAT ARE YOU USING FOR A STEERING BOX AND STEERING COLUMN?
I kept my stock steering column but moved it down about 2 inches in the
column support. At the end of my column is a steering rag joint that goes
directly into the Isuzu steering box, which in turn goes back to the rack. It
took quite a bit of thinking to make a mounting bracket to hold the gearbox and
it also needed the master cylinder/booster attached to it.
7. TALK TO ME ABOUT THE FABRICATION WORK THAT WAS NEEDED ON THE INNER
FRONT DOORS. DO YOUR FRONT WINDOWS ROLL ALL THE WAY DOWN?

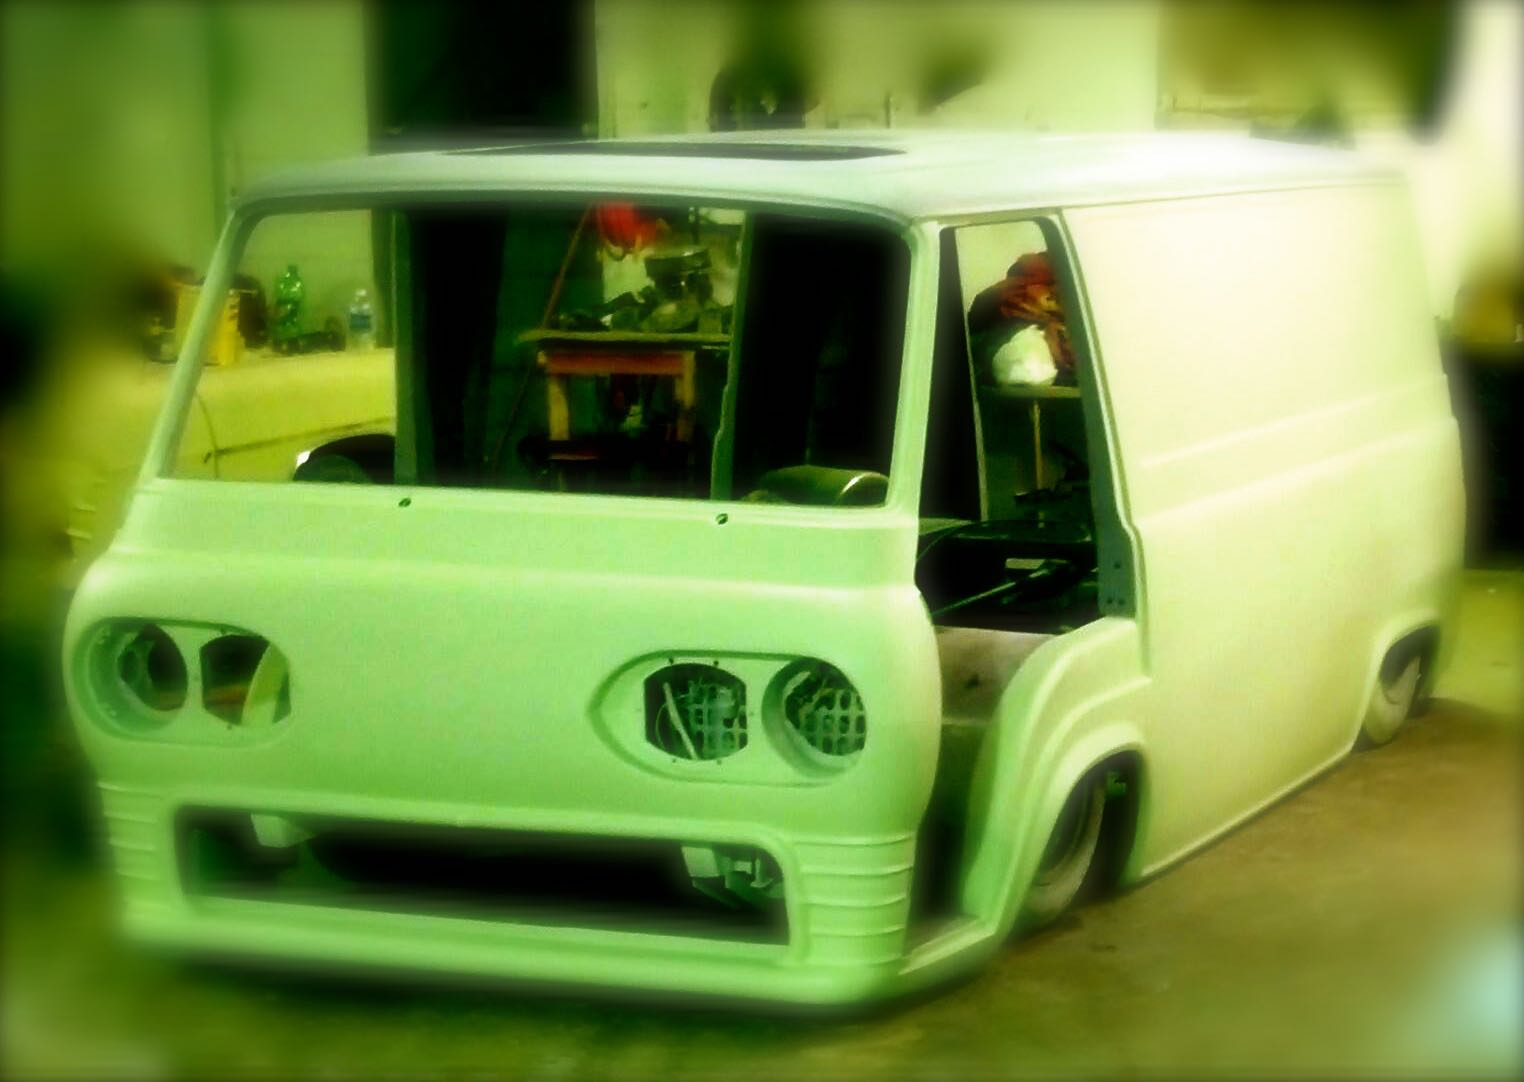
Since the frame is 5 inches higher than it was originally, the fender wells had to come up to allow clearance for the tires. I built my front wheel wells so there is only about 1/2 inch of clearance when the van is fully aired out. I did this knowing that if I kept them as tight as possible, it would give me the most headroom clearance since the van’s seat mounts on its wheel wells. Now that the wheel wells were raised the inner front doors needed to be cut out for clearance. My windows don't go the all the way down because of the way my wells were built. The windows stick up about 2 inches.

Since the frame is 5 inches higher than it was originally, the fender wells had to come up to allow clearance for the tires. I built my front wheel wells so there is only about 1/2 inch of clearance when the van is fully aired out. I did this knowing that if I kept them as tight as possible, it would give me the most headroom clearance since the van’s seat mounts on its wheel wells. Now that the wheel wells were raised the inner front doors needed to be cut out for clearance. My windows don't go the all the way down because of the way my wells were built. The windows stick up about 2 inches.

8. HOW ABOUT THE REAR END, WHAT ARE YOU RUNNING AND HOW ARE YOU SUSPENDING
IT?

I’m running a bagged four-link setup that is tied into my frame’s 5-inch body
drop. For me, hanging the rear and making the frame modifications was
the easier part of the project.
9. WHERE DID THE IDEA FOR SINKING-IN THE HEADLIGHTS AND TAIL
LIGHTS COME FROM?


10. WHAT PARTS COULD THE AFTERMARKET COMMUNITY PROVIDE THAT WOULD MAKE DROPPING
A VINTAGE VAN MORE FEASIBLE FOR OTHER ENTHUSIASTS?
That seems like it may be a hard one to answer. Aftermarket
bolt-on lowering items are one thing, and there is a lot of universal stuff out
there to help you, but there's comes a point where every inch it
goes down some crazy new obstacle to tackle rears its ugly head. A lot of people look at
a slammed van and think it's no different than doing the same to a truck
or car, but they're wrong. The fact of is there are few vehicles as challenging because
you are sitting over the axle in a first-generation van. There's a point when you are going to lose an inch of headroom for every additional inch of lowering.There's just no
way around it. That and the steering configuration are two of the biggest
things to overcome.
11. ANYTHING YOU WOULD HAVE DONE DIFFERENTLY?
Yes! When Brian Morris did his wheel wells, he set them in enough to allow his windows to roll all the way down. I was already pretty far into doing mine when I saw what he'd done. I really thought I was going to be able to pull off getting the windows to go all the way down without doing that. I wasn't. But I can live with the compromise in comfort for the end product. Also, my van’s body was fairly riddled with rot. It would have made a lot more sense to start the project with a cleaner donor. I guess you deal with what you have.

Yes! When Brian Morris did his wheel wells, he set them in enough to allow his windows to roll all the way down. I was already pretty far into doing mine when I saw what he'd done. I really thought I was going to be able to pull off getting the windows to go all the way down without doing that. I wasn't. But I can live with the compromise in comfort for the end product. Also, my van’s body was fairly riddled with rot. It would have made a lot more sense to start the project with a cleaner donor. I guess you deal with what you have.

12. WHAT ADVICE WOULD YOU GIVE OTHERS PLANNING TO BUILD A VINTAGE VAN?

I would say just study what all is going on and understand how much metal
work is involved in getting these on the ground. It really takes a lot of
commitment to the project. Good luck!
Monday, November 30, 2015
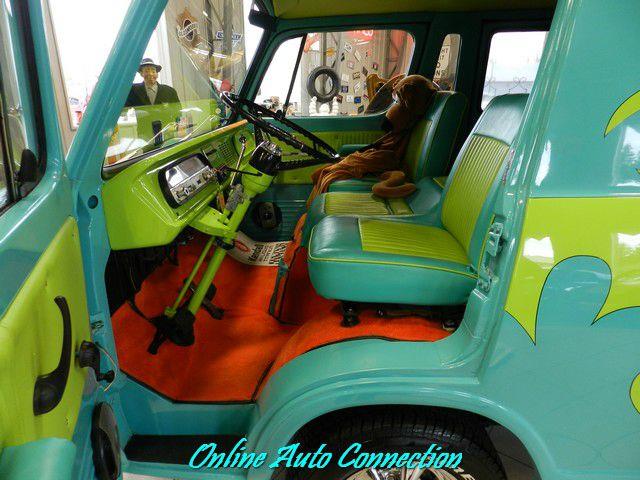
Scooby vans. Blecch! Argh! Ewwww.
When I hear the words Scooby Van, I always have the same response. Just don't.
And I still feel that way. Except for the fact that there are some people who even do wrong, right. And that's what I'd say about this one. I don't love the idea. The concept couldn't interest me in the least. You couldn't pay me to drive it. But I'd be lying if I told you if was anything less than extremely well done. So that said, if you're tempted to do this, don't
After all, it's already been done. And well.
Enuf already.
Got more money than sense?
Here's the link


Friday, November 27, 2015
WHAT WAS I THINKING?
Well, I did something impulsive. I purchased a 1963 Econoline out of Southern California. It was posted in the vans for sale section of the of the excellent Vintage-vans.com website.
Why would I do such a thing, especially in light of the fact that I already have an all-original, one-owner (not counting me) Econoline Panel van? Well, it just so happens that the other van, the seafoam green beauty named "Poochie" (in honor of its original owner), was given to me by the original owner's family who asked only that I "do something interesting with it".
Everyone who sees it asks the same question. "You aren't going to change the paint, are you?" Hell no. And therein lies the reason I bought a second Econoline.
I want to build a period custom.
But I don't have the heart to change the seafoam green exterior of "Poochie". What I have planned for "Poochie" is to leave all the original scars and bruises and the hand-painted type. And to replace the 141 ci engine/3-speed manual trans/puny stock rear end with a completely modern small-displacement drivetrain. To set the engine back as much as possible for improved handling and performance. A plan that, while not expansive from a bodywork standpoint, will require a lot of surgery and fabrication in order to achieve the desired ride height as seen above. Not to mention a fair share of engineering to stab an EcoTec drivetrain.
Simply put, this "Poochie" has been on the back burner for some time and until my 1929 roadster project is on the road, it will remain there. But that doesn't mean I can't start sourcing the parts and researching, and perhaps lining up some sponsors to provide me deals on parts.
Which brings me back to the original subject of this blog.
I want a mild custom 70s-era van. Something period-correct performance upgrades. An ol' school cool vintage van. Something more along the lines of the vans I post regularly on the Vinvanco Facebook page, and gush about on the Vinvanco.com website. As luck would have it, I happened upon a listing. A perfect Southern California-based candidate for what I have in mind. It had one picture and a simple description. The owner described a west coast body with no rust or bondo, and aside from some very minimal rash, it appeared to be in very solid condition. It was a project that had hit the skids due to a messy business dissolution and lawsuit. I spent a good hour getting the whole story of the Southern California van from Sam, its then owner, who offered to put me directly on the phone with the mechanic who did all the fabrication, which consisted of creating a custom transmission crossmember, V8 engine mounts and plumbing a 9" rear end and suspension.
By the time I talked to the mechanic, I could hardly sleep at night. I sent my nephew and brother in law, who know old cars and as luck would have it lived in the same zip code, over to Sam's to have a look. Their report? A clean candidate. All glass was good. The dash was uncut. The roof was uncut and it appeared to have one older paint job over the original factory blue. The interior was a blank canvas with no signs of ever having been modified. The fab work was well done and the engine, while dusty, was not grungy. Besides the fabrication work by the mechanic, the owner, a metal worker, had fashioned a front tunnel from the nose of the van to the doghouse in order to improve airflow. He had also widened the doghouse to accommodate a 289 engine with headers. The van matched the description I'd been given over the phone so I made an offer, it was accepted and one $800 dollar U-Ship transaction later, it was sitting in my backyard.
In truth, I paid less than the previous owner had invested and more than a lot of van folks would shell out for something like this. But I figured I the opportunity to work forward rather than backwards, and could avoid fixing stuff that was done wrong or was rusted out. Everything the owner had done was something I would have done and the cooling tunnel and widened engine compartment were a lucky strike extra.
Which is all just my way of saying that in my opinion, it was well worth the price of admission.
A rock solid, rust-free West Coast body and an upgraded 289/C4/9" drivetrain was all the convincing I needed. The plan for this old girl, which we're calling Pandora, is the subject of another post.
So there you have it. That's what I was thinking.


Why would I do such a thing, especially in light of the fact that I already have an all-original, one-owner (not counting me) Econoline Panel van? Well, it just so happens that the other van, the seafoam green beauty named "Poochie" (in honor of its original owner), was given to me by the original owner's family who asked only that I "do something interesting with it".
 |
| This is Poochie, the proverbial other woman in our stable. |
I want to build a period custom.
But I don't have the heart to change the seafoam green exterior of "Poochie". What I have planned for "Poochie" is to leave all the original scars and bruises and the hand-painted type. And to replace the 141 ci engine/3-speed manual trans/puny stock rear end with a completely modern small-displacement drivetrain. To set the engine back as much as possible for improved handling and performance. A plan that, while not expansive from a bodywork standpoint, will require a lot of surgery and fabrication in order to achieve the desired ride height as seen above. Not to mention a fair share of engineering to stab an EcoTec drivetrain.
Simply put, this "Poochie" has been on the back burner for some time and until my 1929 roadster project is on the road, it will remain there. But that doesn't mean I can't start sourcing the parts and researching, and perhaps lining up some sponsors to provide me deals on parts.
Which brings me back to the original subject of this blog.
I want a mild custom 70s-era van. Something period-correct performance upgrades. An ol' school cool vintage van. Something more along the lines of the vans I post regularly on the Vinvanco Facebook page, and gush about on the Vinvanco.com website. As luck would have it, I happened upon a listing. A perfect Southern California-based candidate for what I have in mind. It had one picture and a simple description. The owner described a west coast body with no rust or bondo, and aside from some very minimal rash, it appeared to be in very solid condition. It was a project that had hit the skids due to a messy business dissolution and lawsuit. I spent a good hour getting the whole story of the Southern California van from Sam, its then owner, who offered to put me directly on the phone with the mechanic who did all the fabrication, which consisted of creating a custom transmission crossmember, V8 engine mounts and plumbing a 9" rear end and suspension.
By the time I talked to the mechanic, I could hardly sleep at night. I sent my nephew and brother in law, who know old cars and as luck would have it lived in the same zip code, over to Sam's to have a look. Their report? A clean candidate. All glass was good. The dash was uncut. The roof was uncut and it appeared to have one older paint job over the original factory blue. The interior was a blank canvas with no signs of ever having been modified. The fab work was well done and the engine, while dusty, was not grungy. Besides the fabrication work by the mechanic, the owner, a metal worker, had fashioned a front tunnel from the nose of the van to the doghouse in order to improve airflow. He had also widened the doghouse to accommodate a 289 engine with headers. The van matched the description I'd been given over the phone so I made an offer, it was accepted and one $800 dollar U-Ship transaction later, it was sitting in my backyard.
In truth, I paid less than the previous owner had invested and more than a lot of van folks would shell out for something like this. But I figured I the opportunity to work forward rather than backwards, and could avoid fixing stuff that was done wrong or was rusted out. Everything the owner had done was something I would have done and the cooling tunnel and widened engine compartment were a lucky strike extra.
Which is all just my way of saying that in my opinion, it was well worth the price of admission.
A rock solid, rust-free West Coast body and an upgraded 289/C4/9" drivetrain was all the convincing I needed. The plan for this old girl, which we're calling Pandora, is the subject of another post.
So there you have it. That's what I was thinking.

 |
 |


Subscribe to:
Posts (Atom)